Quick and Easy Bandsaw Tune-Up Guide
It's no secret that bandsaws are a versatile tool in any woodworker's arsenal; however, bandsaws require tune-ups and blade replacements periodically to ensure optimal performance. This article will walk you through how to maintain your bandsaw for optimum use with minimal downtime. I’ll provide tips on aligning both the fence and blade with respect to the tabletop, adjusting pitch when necessary, squaring up the fence with respect to the miter slot and blade, as well as making sure that everything is aligned parallel throughout these different parts of the saw. These tips can be applied to any brand or style to make sure your bandsaw is always in tiptop shape and keep it running optimally so you can get the best cuts possible. So let's dive into how to keep this tool performing at its peak!
HOW TO TENSION THE BLADE

The first step is UNPLUG THE BANDSAW! Then you can loosen up all of the guides and release the tension in the blade. For this method, you want to have the gullet centered on the wheel. To do this, use your hand to turn the wheel until it is centered adjusting the bade with the tracking wheel on the side of your saw. Once it is centered on the blade, lock the tracking wheel back in place with your side lock. Centering the blade on the gullet will allow the blade to ride in the middle of the cut instead of being curved one way or the other. This will help prevent drift, fishtailing, and wedging against the fence.

The bandsaw blade is tensioned by turning the wheel on the side or bottom of the upper portion of the bandsaw. This will tighten or loosen the blade, depending on which way you turn it. Be careful not to overtighten the blade, as this can cause it to break. The blade should be tensioned until there is about 1/4" of deflection between your two wheels.
HOW TO SET THE BANDSAW GUIDES

Setting the bandsaw guides is the most important step in getting the best cuts from your bandsaw, so make sure you take your time! The guides help to keep the blade on track and prevent it from wobbling or bending. Here's what you need to look for when setting the guides:
The 2 side guides should run along either side of the blade right behind the gullet. And you want to get the rear guide (thrust bearing) right behind the blade so when the blade is actually spinning, there's no contact with any of the guides at all. This needs to be done for both the upper and lower guides.
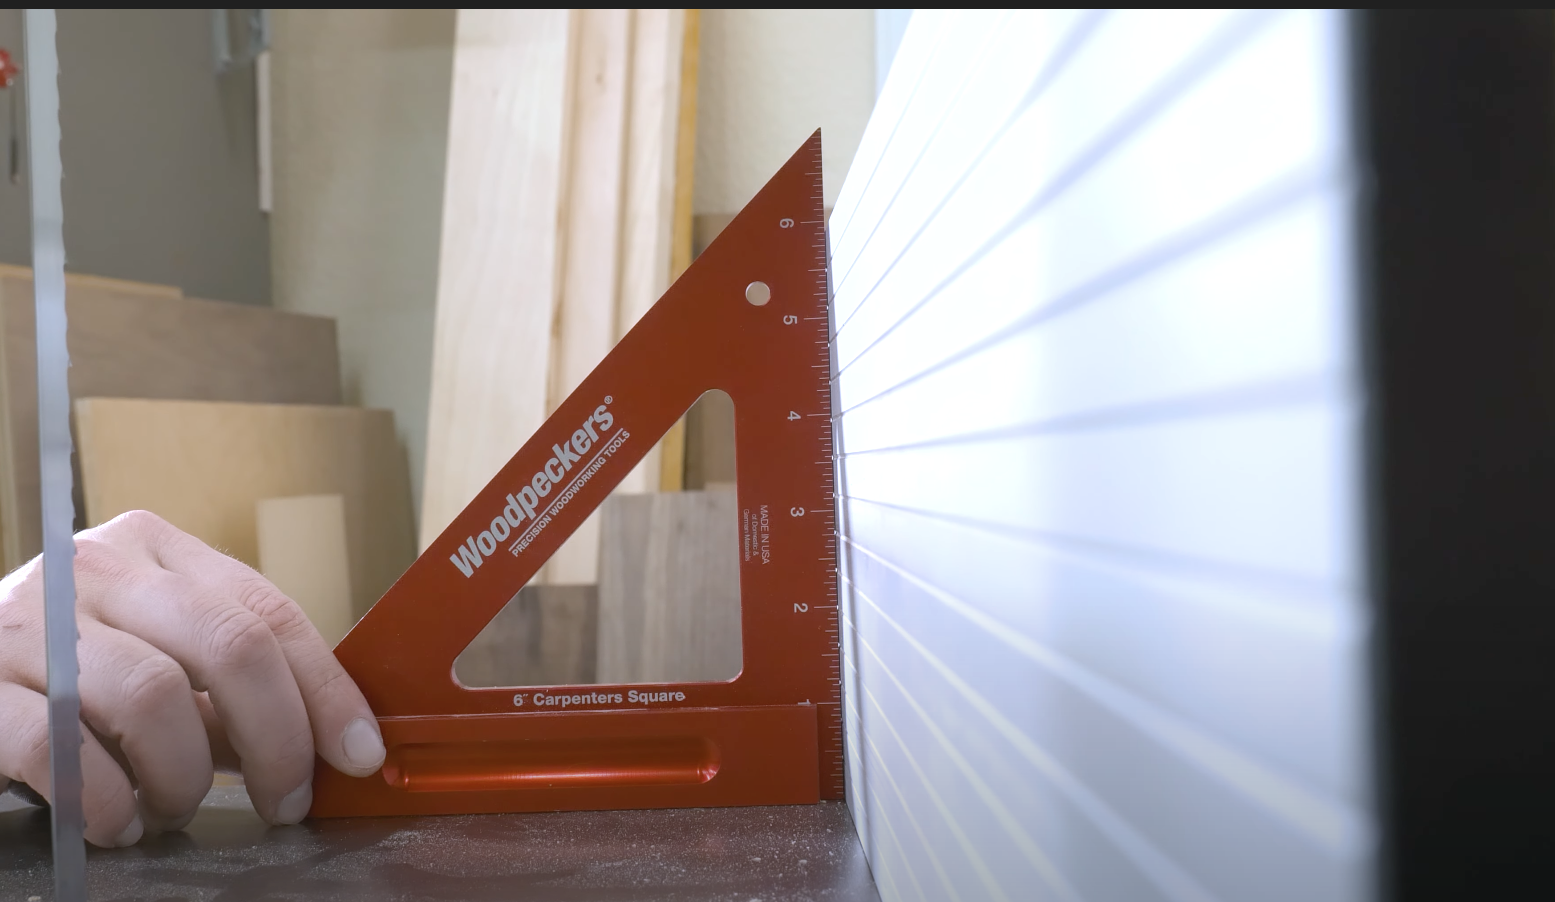
HOW TO ALIGN THE BANDSAW TABLETOP TO THE BLADE

One of the most important steps in getting the best cuts from your bandsaw is to align the bandsaw tabletop to the blade. This can be done by using a square to check the alignment. Align the square with the blade to check for square. If the tabletop is out of alignment, it will need to be adjusted. The process for adjusting the bandsaw tabletop is relatively simple, but it does require some patience and precision.
To adjust the bandsaw tabletop when it is out of alignment, you want to adjust the table pitch on the side of the saw to get it perfectly square. You'll know that you've achieved proper alignment when the blade and tabletop are perfectly perpendicular to each other.
HOW TO SQUARE THE BANDSAW FENCE TO THE TABLETOP
The bandsaw fence should be aligned with the tabletop to ensure accurate cuts. To do this, you'll need to square the fence to the tabletop. This can be done by using a square to check the alignment. Align the square with the fence to check for square. Make sure you check both the front and back of the fence. If the fence is out of alignment, it will need to be adjusted.
The procedure for modifying the bandsaw fence is straightforward, but it does need some patience and accuracy. There are some adjustments on the back of the fence that will allow you to adjust the angle inward or outward. Check the fence and check for squareness again.

HOW TO ALIGN THE BANDSAW FENCE TO THE MITER SLOT AND BLADE
Lastly, to ensure the best cuts from your bandsaw you want to align the bandsaw fence to the miter slot. Drop a stick into the miter slot then set your combination square to an arbitrary number (I used 7 inches). Set the square against the strip at the front of the bandsaw and move the fence so that it is touching the square. Then check the back of the saw to make sure the distance between the miter slot and the fence is the same distance (7 inches) as it was in the front. This will make sure that those long resaws or veneers are going to run straight and parallel eliminating blade drift.

To make sure that the bandsaw blade and the fence are aligned you need a straight edge. Lay it down against the blade so that it creates a parallel line. Creep the fence to the straight edge to make sure that when those are locked in place they run parallel to each other. If that isn't the case, and they are not parallel, there are a couple of bolts underneath the table that you need to loosen to adjust the table. Only take off 3 of those bolts at a time and use a dead blow hammer to lightly tap the table back into square. This will take some trial and error, but the process is worth it in the end!
CHECK YOUR BANDSAW TUNE-UP

Now it’s time to check your work! Use a piece of 2x6 that has a jointed edge so you are nice and flat on the tabletop. Cut about halfway into the board and then move it to the back of the blade to see if it lines up. This will tell you if the blade is running parallel to the tabletop.
You can also cut a slice from the board to make sure you are getting a consistent thickness from the cut.
Follow these tips, to make sure you can get the most accurate cuts on your bandsaw for your projects. If you have any questions about bandsaws or bandsaw maintenance feel free to ask!