Super Mario Sound Diffuser Panels

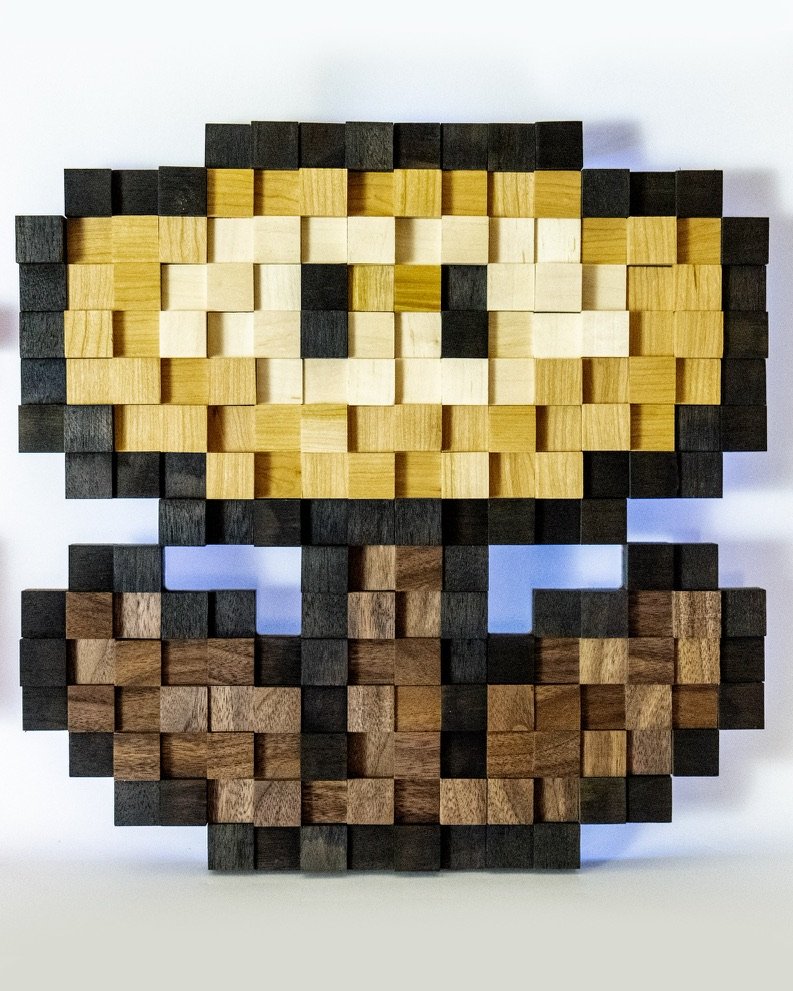
Super Mario is a classic video game character that has been appearing in video games since 1981. This Italian plumber has become an icon in popular culture and has appeared in numerous spin-off games and television shows. Being an 80’s kid, myself, he happens to be one of my favorite video game characters. And I have had Mario on my mind lately since my wife and I are planning on getting our son his first game system for Christmas this year (shhhh)!! So what’s better than a little childhood nostalgia and sharing the characters I loved growing up with my son? That’s why I took on this daunting task of cutting out over 1,200 blocks to create sound diffusers of five of my favorites from Super Mario Bros. - Mario (of course), Toad, Goomba, the Question Block, and the Fire Flower.
Watch the full video and let me know what you think in the comments.
About The Design
The Mario 8-bit design is a classic and it also lends itself perfectly to creating sound diffuser art that is reminiscent of my childhood. When it comes to this classic design, there are a few key things I needed to keep in mind. First, he needs to be immediately recognizable as Mario. This means keeping his signature red hat and mustache. Second, he should be simple and iconic - remember, he's an 8-bit character after all.
What You Will Need
Make sure you check out the video for a full tutorial on how to create these Mario Characters.
So for these designs I wanted to keep the wood natural and let the colors speak for themselves. I chose to use walnut, cherry, maple, bloodwood, purple heart, and a few pixels of canary wood. I did ebonize the walnut to create some darker pieces, almost black - because at some point, you run out of different colors of wood. Check out this video on floating shelves for a more in-depth dive in how to ebonize walnut.
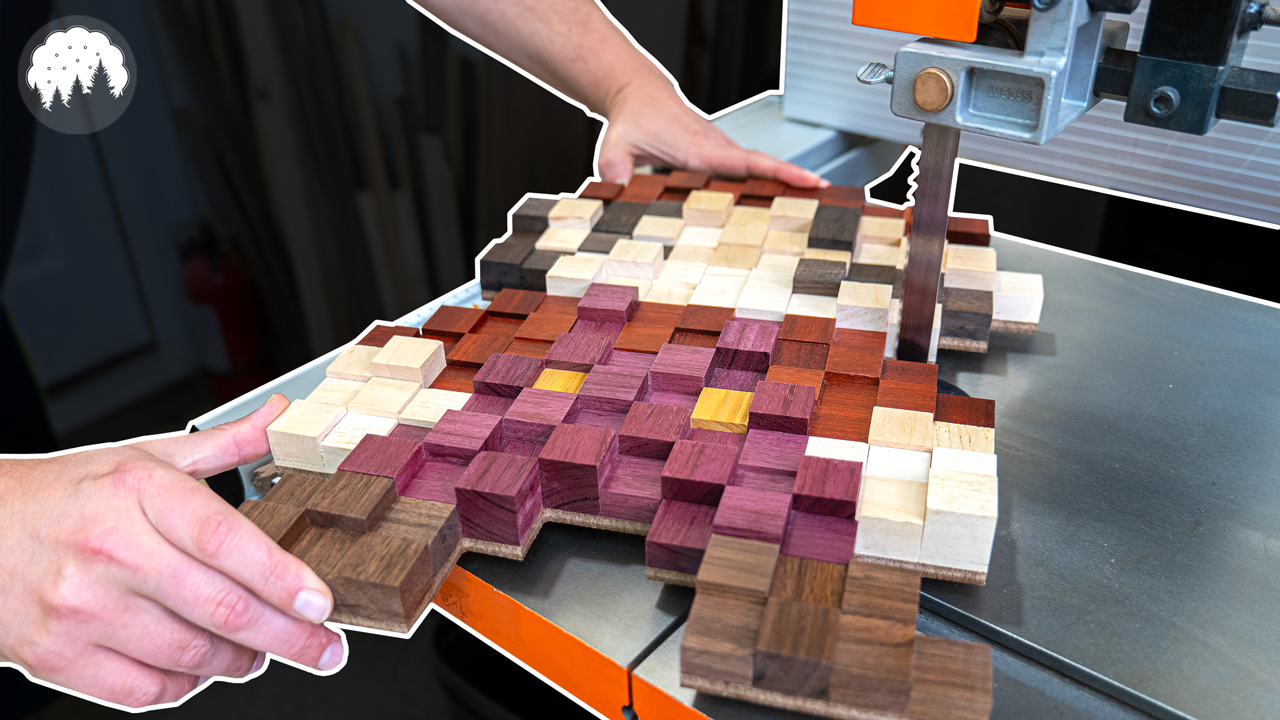
Other than that, I used a bandsaw, table saw, and a router for the tools. Some other items needed are MDF for the back of the characters, sand paper, a straight edge, CA glue, and patience, a lot of patience. Doing the same thing over and over again is nothing to scoff at - and to build all of these that means over 2000 cuts (if you want some extra pieces).Design Choices for the Wall Cabinet

The Process
As I mentioned above, the process to create these Mushroom Kingdom characters is quite redundant. First, you start out with the pixel design and decide which wood types you are using for each color. I designate that in the plans here.
Next comes the cutting. When you are cutting the “pixels,” make sure your stop block is clamped down tight! Even the slightest variation can ruin the effect, so you're striving for something close to perfect here. I did vary the height of each “pixel” to give it a more 3-D look in the end by running my stips through the planer at random intervals.
Once you have all your blocks cut to squares, it’s time for sanding. Grab a friend and ask them to help you with this, you will be here for hours (but it’s worth it.) Offering them some takeout definitely sweetens the deal. But, since I planed the boards with a sharp blade the sanding goes quickly. Plus, you don’t want to create any uneven sides or round over the edges so sand lightly.
Completion
And now for the glue-up. I used CA glue to adhere each pixel to the MDF board (in a somewhat random order of varring heights.) Making sure to double and triple check each row for errors before applying the glue. A friend can help here too! Four eyes are better than two.
After the glue has dried, take each design to the bandsaw and remove any excess MDF. Be super careful not to cut into any of the pixels. And once you’re done with that, use a flush-trim router bit over at the router table to clean up the edges. Some of them will be uneven but that’s okay, it goes with the design for the sound diffusers.
Finally, you can apply the finish and attach some battery powered LED lights to the back.
A Few Final Tips
Take your time and take breaks if you need too
Triple check your more cube shaped blocks. You want the face grain out not the end grain.
Use a spray finish as it’s easier to apply
Have fun with your wood types and use something different
Don’t forget to get your templates here and let me know how yours turned out by tagging me on Instagram here or with #BiscuitBuild as always, I’ll see ya next time.