Maximizing a Small Garage Shop: My Go-To Layout
Today, I want to share some insights on one of the most game-changing setups I’ve discovered for small garage workshops: placing your major workstations (like the table saw, outfeed table, and bench) in the center, and lining the perimeter with your remaining tools and storage. If you’re short on space but big on ideas, this post is definitely for you.
Why Perimeter Placement Works

When you’re working with a limited footprint—say, a 2-car garage with around 400–450 sq ft—using every inch effectively is crucial. One of my top strategies is to mount and position as many tools, cabinets, and storage units along the walls as possible. Here’s why:
Easy Access: Having your planer, jointer, drill press, and other large tools or cabinets around the edges means you always have a clear path in the center. There’s no need to haul tools in and out just to start working.
Visual Organization: By lining the walls with cabinets, and storage units, you create a “visual map” of where everything belongs. It reduces time spent searching for that one chisel or tape measure—which, in my experience, is half the battle in a busy shop!
Maximized Floor Space: When your larger tools stay flush against the perimeter, you preserve the middle of the shop for movement and workflow creating a sort of race track around the space. Fewer obstacles on the floor means you can maneuver large projects or full sheets of plywood without feeling cramped. For me, I have my jointer, planer, bandsaw, drum sander, cnc, drill press, and router all along the perimeter of my shop.
I think one of my best ideas to maximize my floor and wall space is the clamp rack I built. I had many comments and people say that by doing it my way, I was wasting wall space and I should stack them out from the wall. However, since I am trying to best maximize my floor space, that solution does not make sense. It will protrude too far from the wall, not allowing me to utilize the floor space underneath it (which I feel is a higher priority). You can check that build out here and get the plans for it here if you think this type of clamp storage system would work best for you.
Here a few of my other projects that I have along the perimeter and walls of my shop:
Shop Tool Cabinet
Watch the Video Here!
Get the Plans Here!
Hand Tool Till
Watch the Video Here!
Get the Plans Here!
Wood Shop Storage Cabinets
Watch the Video Here!

The Table Saw at the Center
I can’t stress enough how crucial the table saw is in my shop workflow. From ripping down boards to precise joinery cuts, it’s the heart of many projects. Positioning it in the center has two main benefits:
Safety First: It’s easier to keep a clear “safe zone” around the blade when the saw is centrally located. You avoid the risk of bumping into walls or other tools mid-cut.
Workflow Efficiency: With the saw in the middle facing the garage door, you have the freedom to feed material from out the door if needed giving you even more space. With an outfeed table at the other end, your production space is greatly expanded.
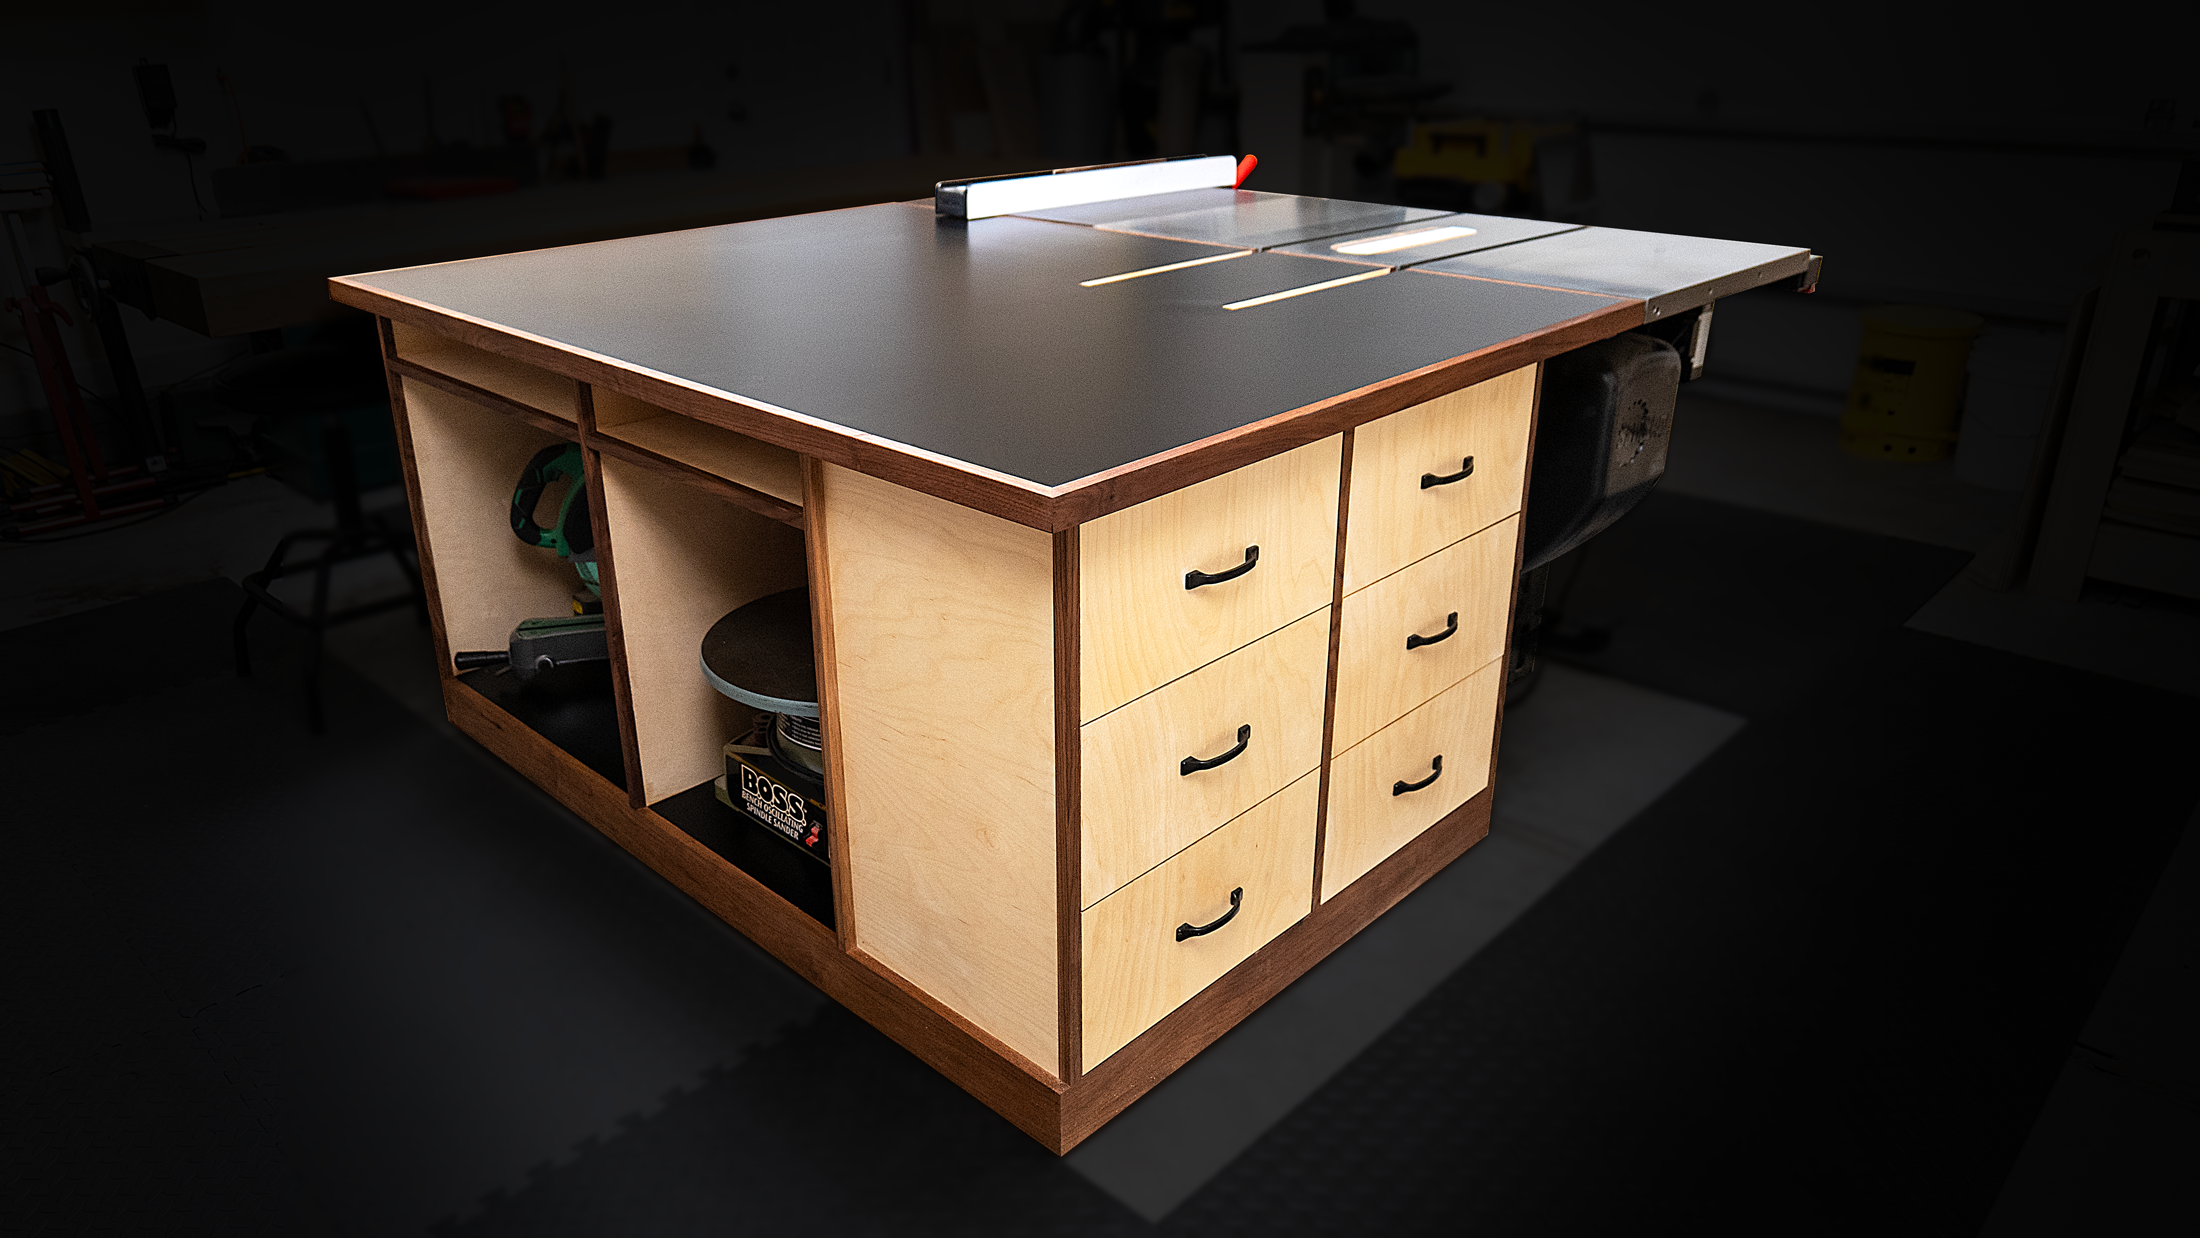
The Outfeed Table: Multifunctional Marvel
Right behind my table saw is my outfeed table, and I rely on this surface for so much more than just catching boards. Think of it as the Swiss Army knife of your shop:
Extra Assembly Space: Once you’ve ripped down your pieces, you can simply slide them onto the table, and you’re already set up for assembly. No more carrying cut stock to a separate bench.
Additional Storage: I incorporated drawers or cabinets beneath my outfeed table for frequently used items and storage—measuring tools, push sticks, and random hardware. This keeps them right at hand. I also designed and built my outfeed table to store my air compressor and miter saw.
Work Surface Extension: When I’m not actively running the table saw, this surface becomes an extension of my main workbench. If you plan it out carefully, it can match the height of your bench, giving you a larger uninterrupted surface for bigger projects.

The Central Workbench
Finally, if you have room for a dedicated workbench in the center—or slightly offset in the middle—go for it. Mine sits just off to one side of my outfeed table and table saw but still central to the workshop flow. Here’s why that helps:
Uninterrupted Creativity: A centrally located bench allows you to walk around all sides of a project. This is particularly handy for intricate assemblies or finishing touches.
Natural Divide: The bench acts as a “hub” for measuring, gluing, and fine-tuning before or after the table saw process. It feels intuitive to move from saw to bench without crossing the entire shop.
Tips for Small Shop Efficiency
Multi-Use Surfaces: Any table in your shop can do double duty. Maybe it’s an outfeed table plus an assembly station. Or a bench plus a miter saw stand.
Vertical Storage: Utilize wall space from floor to ceiling. Pegboards, French cleats, and overhead racks keep lesser-used items out of the way.
Mobile Bases: If you must move tools around, put them on casters. That way, you can roll out the jointer or bandsaw when needed, then tuck it back.
Lighting: Good overhead lighting is critical in a small shop where every detail counts. Consider adding task lighting at each station, too.
Dust Collection: A compact dust collection system (or even a well-placed shop vac) keeps the air clear and frees up more space to maneuver. Check out my post about small shop dust collection here.
How to make the most of your small shop
By placing tools around the perimeter of my garage and keeping the table saw, outfeed table, and workbench in the center, I’ve created a shop layout that’s efficient, safe, and truly enjoyable to work in. Every square foot has a purpose, and I never feel like I’m tripping over gear or scrambling to find the right tool.
So, if you’re looking to optimize your small garage for woodworking, I highly recommend giving this layout a shot. It might take a weekend (or three!) of reorganization, but trust me—the payoff in workflow and peace of mind is worth it.
Thanks for stopping by, and I hope you’ll find some ideas to help you make your own woodworking space as functional as possible. Until next time, keep building, stay creative, and never stop experimenting with ways to make your shop work better for you!
