Butterfly Keys in Woodworking: Everything You Need to Know
Hey there, fellow woodworkers. Today, we're diving into the world of butterfly keys—not the insect, but the kind that can save your woodworking projects and make them look pretty amazing too. For my latest build, I needed to add a butterfly or bowtie to the panel I built for my desktop. So, whether you're a seasoned pro or just getting started, understanding how and when to use butterflies keys can take your work to the next level. Let’s get started!
What is a Butterfly in Woodworking
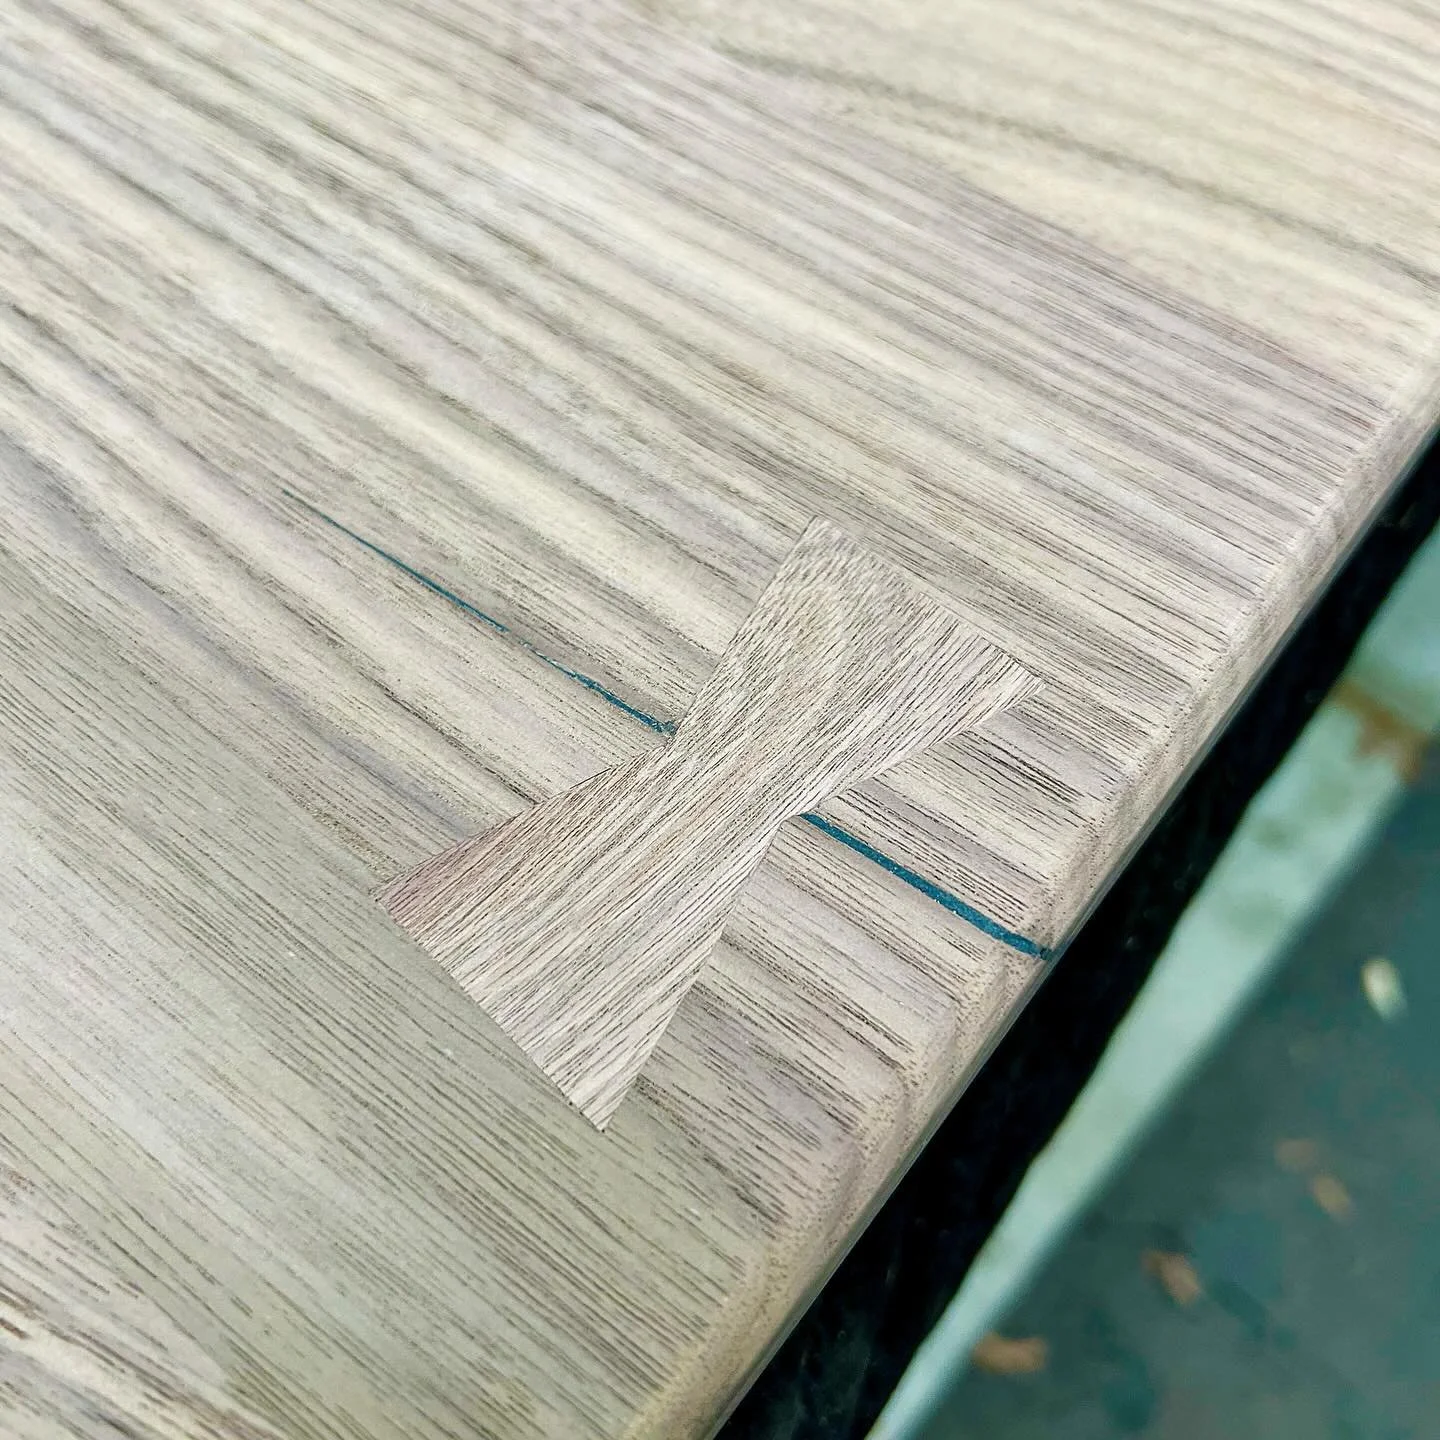
In woodworking, the terms "bowtie" and "butterfly key" are often used interchangeably to describe a small, hourglass-shaped piece of wood used to reinforce cracks or join pieces of wood together. Despite their different names, both serve the same purpose: providing structural support and adding a decorative element to woodworking projects. The choice of term usually comes down to regional preferences or personal style. While some woodworkers might prefer the term "bowtie" due to its simple, elegant connotation, others might opt for "butterfly key," which evokes the natural, symmetrical shape of a butterfly. Regardless of what you call them, both terms reflect the beauty and functionality these small wooden inserts bring to woodworking.
Why Use Butterfly Keys in Woodworking?
Structural Integrity
Imagine you’ve got a beautiful slab of wood or panel with a nasty crack running through the end. Butterflies are perfect for reinforcing those weak points and preventing further splits. They add extra strength and stability, keeping your piece intact for years to come.
Aesthetic Appeal
Bowties aren't just functional; they’re also a design statement. Adding a bow tie can turn a potential flaw into a stunning feature, showcasing your craftsmanship and giving your piece a unique touch. But for me, I like the clean look. So for this desk, I added the butterfly key to the bottom of the top of the desk. It makes for a nice hidden gem and allows me to keep the straight lines of the walnut panel undisturbed by the bowtie.
Versatility
From tables to cutting boards to furniture, bow ties can be used in various woodworking projects. They’re incredibly versatile, making them a must-know technique for any woodworker.
Alternatives to Butterfly Keys in Woodworking
Splines
Splines are similar to bow ties but are typically used in edge joints. They add strength but don’t have the same visual appeal as bow ties. Pros: easy to make and install. Cons: not as decorative.
Dowels and Biscuits
Dowels and biscuits are great for aligning and strengthening joints but don’t offer the same decorative element. They’re hidden inside the wood, doing their job quietly.
Epoxy Fillers
Epoxy can fill cracks and add strength, plus you can get creative with colors. However, it doesn't provide the same mechanical reinforcement as a butterfly key.
When Do I Need to Use Bowties in Woodworking
Severe Cracks, Checks, and Splits
If your wood has severe cracks, bow ties are your best bet for reinforcing and saving it. They provide a strong, visible fix that’s both functional and attractive.
High-Stress Areas
Butterfly keys add that extra bit of security to ensure longevity for pieces that will experience a lot of stress, like tabletops or chairs.
Preservation of Unique Wood Pieces
Do you have a rare or sentimental piece of wood? Bow ties can help preserve its integrity while adding a touch of beauty. It’s a win-win!

Step-by-Step Guide to Using Bowties
Materials and Tools Needed
- Wood for Butterfly Keys
- Chisels
- Mallet
- Router (optional)
- Glue
Preparation
Choose the right wood for your bowties—something hard and contrasting works well. Measure and mark the area where the crack is, and plan the size and shape of your bowtie. The grain of the bowtie should run across the shape and be perpendicular to the grain of the panel or slab.
Cutting and Fitting the bowties
You can cut bowties by hand or use a bandsaw. Ensure they’re precise so they will fit snugly. Once you have your basic shape, you can clean up the edges with a sharp chisel. Next you need to cut a matching mortise (hole) in your project piece. Just use a marking knife to trace your butterfly key to get this shape. Your mortise should be slightly more shallow than the bowtie. From there, you can use a combination of a router with a down-cut bit and a chisel to remove the material. Test the fit often, but don’t fully seat the bowtie; you’ll likely never get it removed.
Installation
Apply glue to the bottom of the mortise, then tap the bowtie into place with a mallet. I like to use a scrap piece of wood between the butterfly and the mallet to help distribute the force. From there, just ensure it’s fully seated and let the glue dry. Once it's set, hand plane and sand everything smooth.
Tips and Best Practices
Choosing the Right Size and Shape
Make sure your bowtie is proportionate to the crack or split. Too small, and it won’t provide enough support; too large, and it might overwhelm the piece.
Ensuring a Tight Fit
Take your time to cut and fit the bow tie perfectly. A tight fit ensures maximum strength and a clean look. You can also chamfer the bowtie's bottom edge to allow some glue to squeeze to the edges.
Maintaining the Integrity of the Wood
Bowties are an incredible tool in the woodworker’s arsenal. They provide strength, enhance aesthetics, and can save your cherished pieces from the scrap pile. While there are alternatives, nothing quite matches the charm and functionality of a well-placed butterfly key.
So, give it a try on your next project! Experiment with different woods and sizes, and see how bowties can transform your work.