Building a Kamado Grill Station
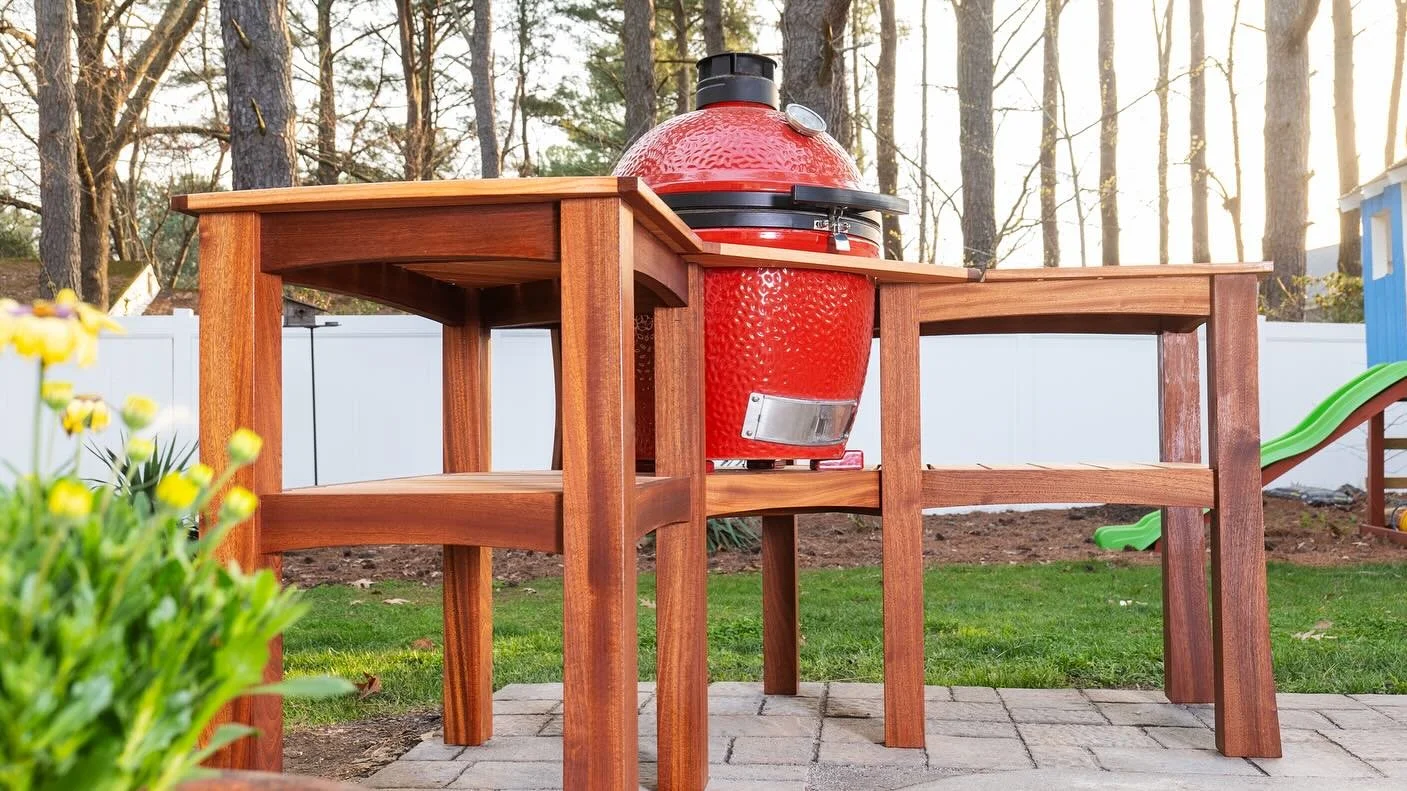
Summer and grilling season is right around the corner, and there’s nothing better than enjoying a grilled ribeye on a cool summer night (at least for me). I have had my Kamado grill for a couple of years and have been using it with the small wing attachments and stand that came with it. And the one thing I couldn’t stand was that there was nowhere to put everything I needed. As grilling enthusiasts, we understand the importance of having a dedicated space that not only elevates the grilling experience but also withstands the rigors of outdoor conditions. That's where the art of woodworking comes into play.
So today, I’ll delve into the intricacies of building a grill station crafted from Sapele and Eucalyptus hardwoods meticulously designed to accommodate a Kamado grill. From selecting the best wood for outdoor use to mastering mortise and tenon joinery techniques, and ensuring proper water drainage, every aspect of this project is aimed at achieving durability, functionality, and aesthetic appeal.
So let’s get started!
Selecting the Best Wood for Outdoors
Now, let's get into the nitty-gritty: choosing the wood. After a bit of a deep dive and a lot of back and forth, I landed on two winners for this project: Sapele and Eucalyptus. Let me tell you, these aren't your average choices, but then again, we're not aiming for average, are we?
Why Sapele and Eucalyptus outdoors?
Here's the scoop. When it comes to outdoor projects, you want wood that can handle the drama of changing weather, occasional spills, and, let's be honest, the occasional neglect. Both Sapele and Eucalyptus are tough cookies in this department. They're like the superheroes of the wood world, with special powers like rot resistance and an uncanny ability to look good no matter what Mother Nature throws their way..
Sapele: The Sturdy Showstopper
First up, Sapele. This wood is a stunner, with its rich colors and intricate grain patterns that can make any grill station look like a million bucks. But it's not just about looks; Sapele is as sturdy as they come, ready to face the elements without batting an eye. It's like that friend who's always dressed to impress but can also hike up a mountain without breaking a sweat.
Sapele originates from tropical Africa. It boasts a rich reddish-brown color and distinctive interlocked grain patterns and offers excellent dimensional stability and resistance to warping and splitting, making it well-suited for outdoor use.
Eucalyptus: The Eco-Friendly Challenger
Then we've got Eucalyptus, the eco-warrior of the wood world. It grows fast, which makes it a sustainable choice for those of us trying to keep it green. With origins in Australia, eucalyptus is prized for its durability and natural resistance to decay and insects. Available in various species, eucalyptus exhibits diverse grain patterns and colors, ranging from light yellows to deep reds. It's a bit lighter than Sapele, giving it a fresh, modern vibe which will also allow there to be some cool contrast to this build. And just like Sapele, it's tough enough to stand up to outdoor life, making it a fantastic partner in crime for any grill station.
What are Other Good Outdoor Woods?
Sure, there are other woods out there like cedar, teak, and ipe that are great for outdoor use, but I chose Sapele and Eucalyptus for their unique combo of durability, beauty, and sustainability. Cedar smells amazing but isn't quite as hardy. Teak is the luxury choice but comes with a hefty price tag and some sustainability concerns. Ipe is super tough but can be a pain to work with.
Choosing Sapele and Eucalyptus was all about hitting that sweet spot between functionality, looks, and doing right by the planet, and availability. These woods are set to ensure our grill station isn't just built to last but also designed to impress and inspire every time we fire up the grill.
Let’s Talk About Joining the Party – Mortise and Tenon Style
Alright, now that I’ve talked about our superhero woods, it’s time to dive into the world of wood joinery. This part is crucial for making sure our grill station isn’t just for show. I need this grill station to stand the test of time, parties, and whatever else I throw at it.
Why Use Mortise and Tenon Joinery?
This classic joinery method is like the secret handshake of the woodworking world. It’s been around for thousands of years, and for good reason. It’s all about creating strong, simple connections that can handle loads of stress and strain without failing.
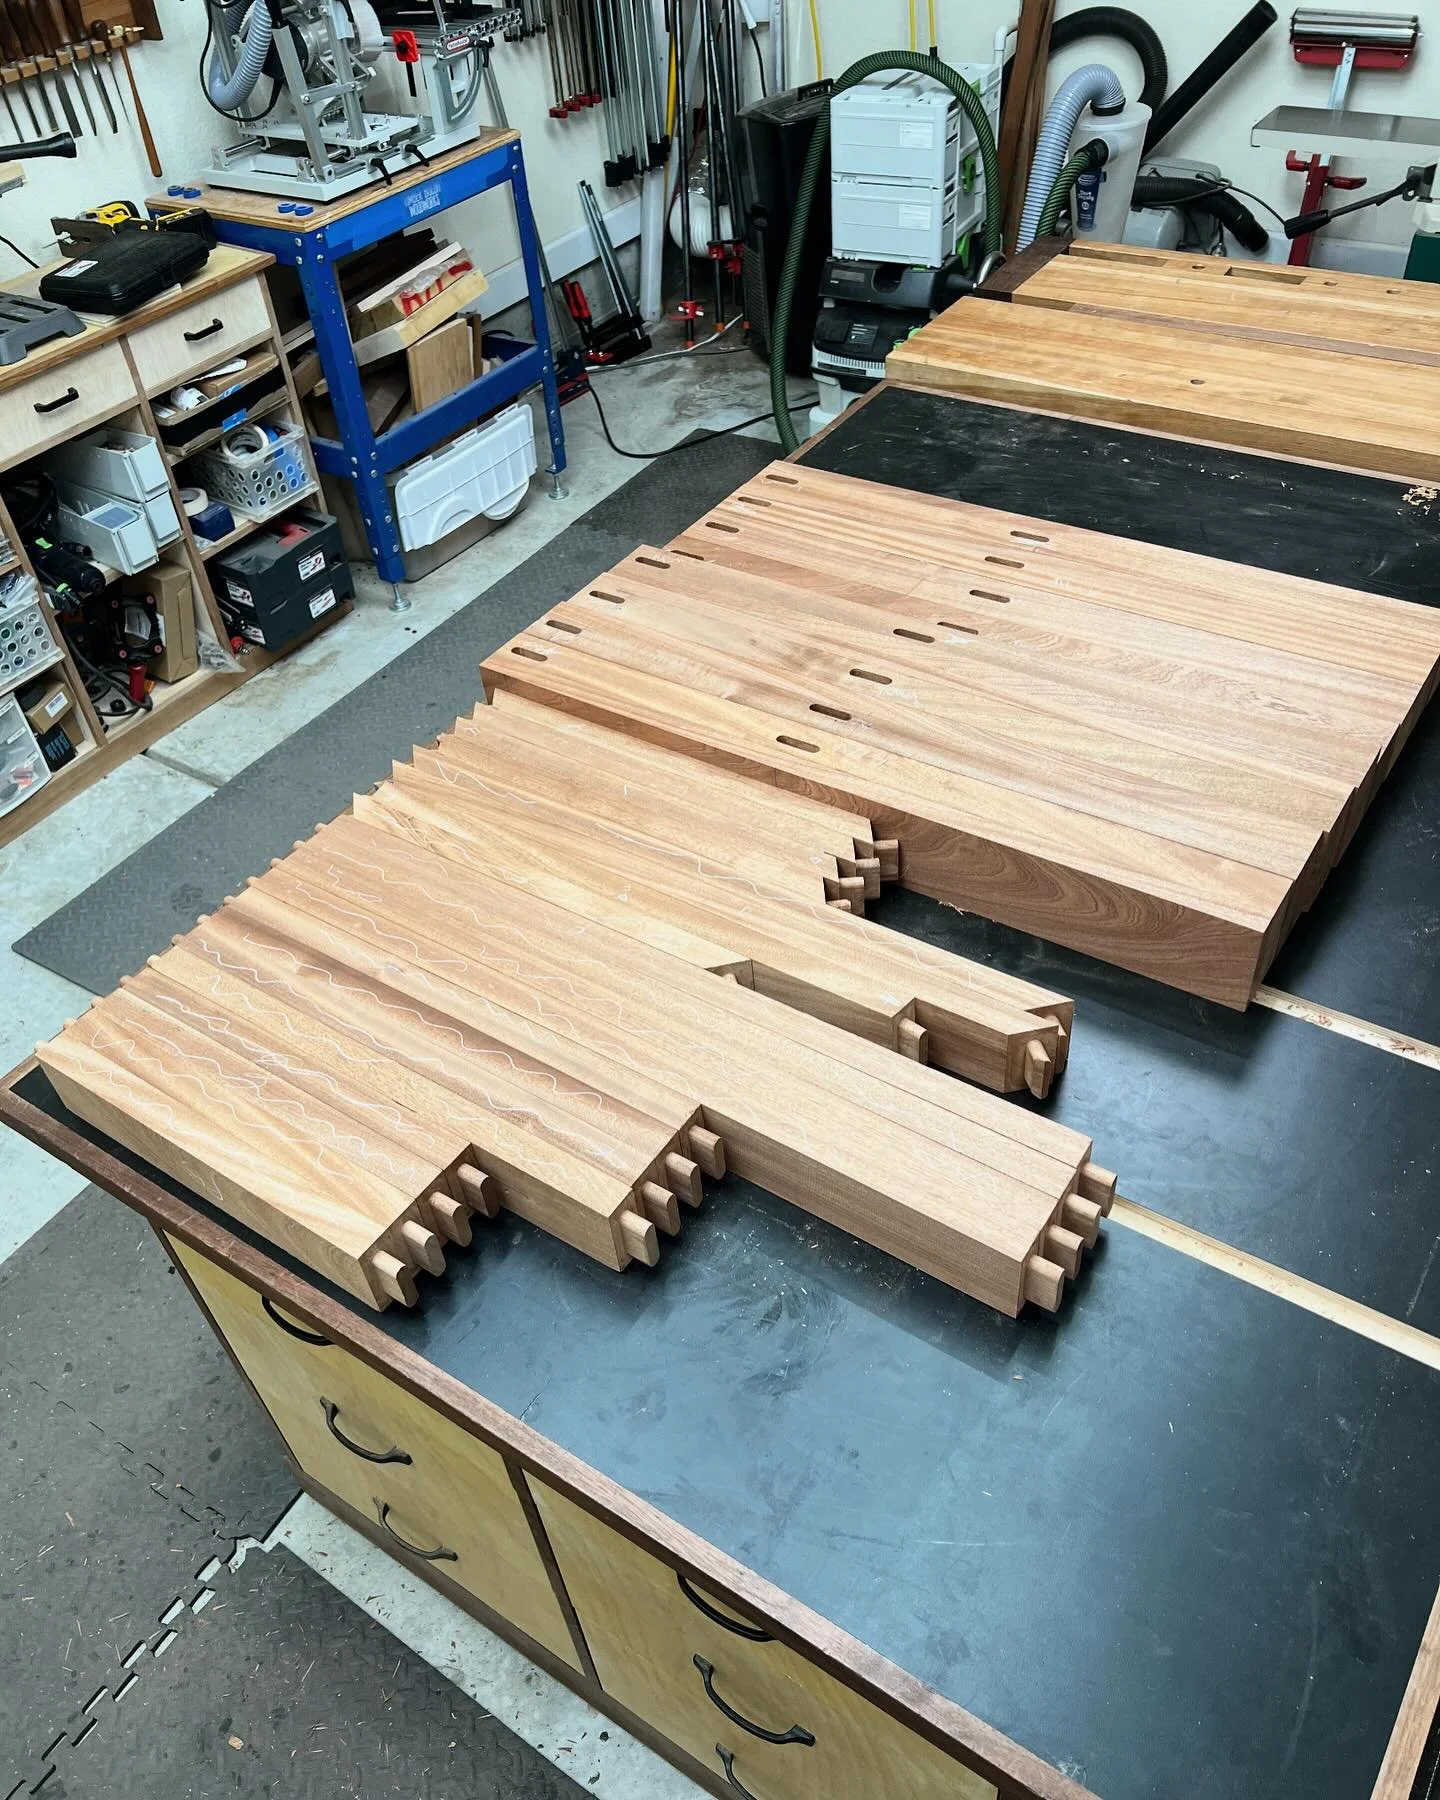
Think of mortise and tenon joinery as the dynamic duo of the wood world. The mortise is a slot, hole, or recess cut into one piece of wood, and the tenon is a projection on the end of another piece of wood that fits snugly into the mortise. When they come together, they create a bond that’s tough, sturdy, and, with a bit of glue, nearly indestructible.
Now, before you start thinking this is too complex, hear me out. Yes, it takes a bit of practice and patience, but the result is so worth it. Plus, there’s something deeply satisfying about creating something with your own two hands that’s built to last. Whether you’re using traditional hand tools or modern power tools, the essence of crafting a mortise and tenon joint remains the same. For this one, I used a PantoRouter (Use code BISCUIT for $200 Off the all-in package) since there were over 40 mortise and tenon joints that I needed to make. If I were to do this by hand, I would probably still be out in the shop working away.
Tips for Beginners
- Start Simple: Practice makes perfect. Start with some scrap wood to get the hang of it before moving on to your actual project pieces.
- Measure Twice, Cut Once: This age-old advice cannot be overstated. Accuracy is key in making sure your joints fit together perfectly.
- Use the Right Tools: Whether you’re chiseling by hand or using a router, make sure you’ve got the right tools for the job. A sharp chisel and a steady hand go a long way.
Designing for Laughs, Grills, and Spills – The Genius of Slats
Now, we’ve talked about choosing the champ woods and mastering the ancient art of mortise and tenon joinery. So, what’s next on our grand adventure of building the ultimate grill station? It’s all about the design, my friends. But not just any design—we’re talking about a setup that’s smart, slick, and ready to handle everything from a splash of marinade to a full-on summer storm.
Why Water is the Arch-Nemesis of Our Grill Station
Before we dive into the blueprint of our masterpiece, let’s chat about water. It’s essential for life, but when it comes to wood, it’s pretty much the villain. Water hanging out on your wood can lead to rot, mold, and all sorts of uninvited trouble. So, the goal? Keep water moving. Don’t let it loiter on your wood like a bunch of teenagers at a mall.
The Brilliant Solution: Slats
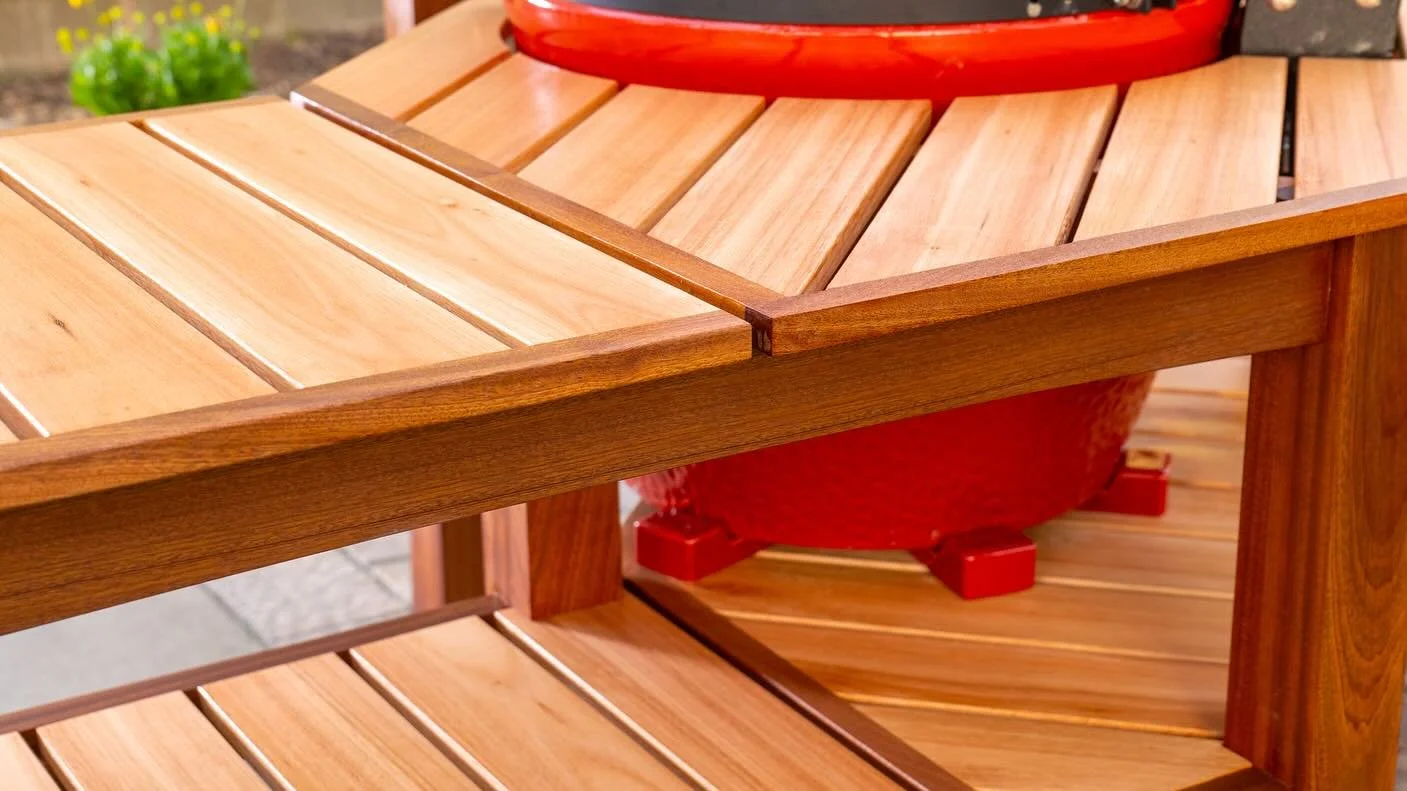
Enter the hero of our story: slats. By incorporating slats into the design of our grill station, we’re not just adding a dash of modern flair; we’re strategically engineering a way for water to flow through instead of crashing the party. Think of slats as the bouncers of our grill station, showing water to the door before it can cause any mischief.
When sketching up the designs for this grill haven, the choice to use slats was a no-brainer. Not only do they address our arch-nemesis (water, remember?), but they also give the whole structure a sleek, open look that screams, “I’m not just a grill station; I’m a masterpiece.” Plus, the slats echo the kind of thoughtful, intentional design that turns a backyard BBQ into a culinary event.
Here’s Why Slats Rock:
- Water Drainage: Slats allow water to run off quickly and efficiently, reducing the risk of water damage. It’s like having little canals guiding water away from your build.
- Air Circulation: They’re not just about getting rid of water; slats also promote better air circulation, which helps the wood dry faster and prevents the buildup of moisture. Say goodbye to unwanted mold and mildew guests.
- Aesthetic Appeal: Let’s not forget, slats look super cool. They add a touch of elegance and modernity to our grill station, making it not just a functional piece but a statement piece. Plus, this design goes perfectly with this outdoor chaise lounge that I built a couple years ago.
Designing our grill station with slats isn’t just about making something that looks good; it’s about creating a space that lives and breathes with the outdoors. It’s about crafting a spot that invites you, your family, and your friends to gather around, share a meal, and make memories, all while standing the test of time (and weather). So, here’s to slats – the unsung heroes of our grill station saga. Let’s raise our spatulas to smart design and great grilling!

Keeping It Fresh – The Magic of UV Protection Oil
We've chosen our woods, nailed the joinery, and designed a grill station that laughs in the face of water. But even superheroes need a little armor, and our grill station is no exception. It's time to talk about protection, folks – and I'm not just talking about an apron for splattering BBQ sauce.
Protecting Wood from UV Rays and Weather
Just like we need sunscreen to fend off those UV rays, our beautiful Sapele and Eucalyptus creation needs a shield to keep it looking sharp. Sunlight, rain, and even that occasional (or not so occasional) beer spill can make our wood weary over time. We want our grill station to be the life of the party for many summers to come, not just a one-season wonder.
This is where Osmo UV Protection Oil steps into the spotlight. Think of it as the ultimate sunscreen for wood. Not only does it protect our grill station from those harsh UV rays, but it also makes it water-repellent. It's like giving our wood a superpower against the elements.
Why Osmo?
I've been down this road before with my planter boxes and chaise lounge a few years back. I treated them with Osmo UV Protection Oil, and let me tell you, they’ve faced sun, rain, and a little bit of snow like champs. They still look as good as the day I finished building them. Seeing how well it worked, it was a no-brainer to give my grill station the same VIP treatment. Now, depending on where your projects are stored, it is a good idea to check the finish annually and reapply as needed.
Osmo UV Protection Oil isn’t just about durability; it also enhances the natural beauty of the wood. It brings out the richness of Sapele and the fresh vibes of Eucalyptus, making the colors pop and the grain patterns dance. It’s like an Instagram filter for your grill station, but in real life and without the need to reapply every few hours.
Applying the Finish
Applying Osmo UV Protection Oil is a breeze. A clean surface, a brush or roller, and a bit of elbow grease are all you need. It's a satisfying final step in our grill station journey, kind of like icing a cake or your grilled chicken with just the right amount of sauce. You get to watch the wood transform, knowing you're sealing in all that hard work with a layer of protection that’s as tough as it is beautiful.
So, there you have it. The grill station is not just built; it's protected. It's ready to face whatever the world (or the weather) throws its way, all while looking absolutely fabulous. Here’s to building something that lasts, to summer BBQs that stretch into the night, and to creating a space where memories (and delicious meals) are made. Cheers to the grill stations of the world and the people who make them shine!